Conquer Your Fuel Gauge: Mastering the 2-Wire Sending Unit Test
Is your fuel gauge playing tricks on you? Stuck on empty? Maybe it's perpetually full, giving you a false sense of security? Before you rush to the mechanic and shell out your hard-earned cash, take control and learn how to diagnose the problem yourself. A faulty fuel sending unit is a common culprit, and testing it is surprisingly straightforward.
Checking a 2-wire fuel sending unit is a skill that empowers you to understand your vehicle better and potentially save a significant chunk of change. It's about taking charge of your finances and not letting car troubles drain your wallet. This guide will provide a comprehensive understanding of how to evaluate your fuel sending unit, arming you with the knowledge to tackle this common car issue head-on.
The 2-wire fuel sending unit has been around for decades, evolving from simple float-and-rheostat systems to more complex electronic sensors. Its primary function is to measure the fuel level in the tank and relay that information to the fuel gauge. The importance of a properly functioning fuel sending unit is obvious: accurate fuel level readings prevent unexpected stops and potential damage to the fuel pump, which can occur if it runs dry.
One of the main issues related to fuel sending unit testing is misdiagnosis. People often assume a faulty gauge is the problem when the sending unit is the actual source of the inaccurate readings. Another issue is the fear of working with electrical components. However, with a little guidance, you'll find that testing the sending unit is quite simple and safe.
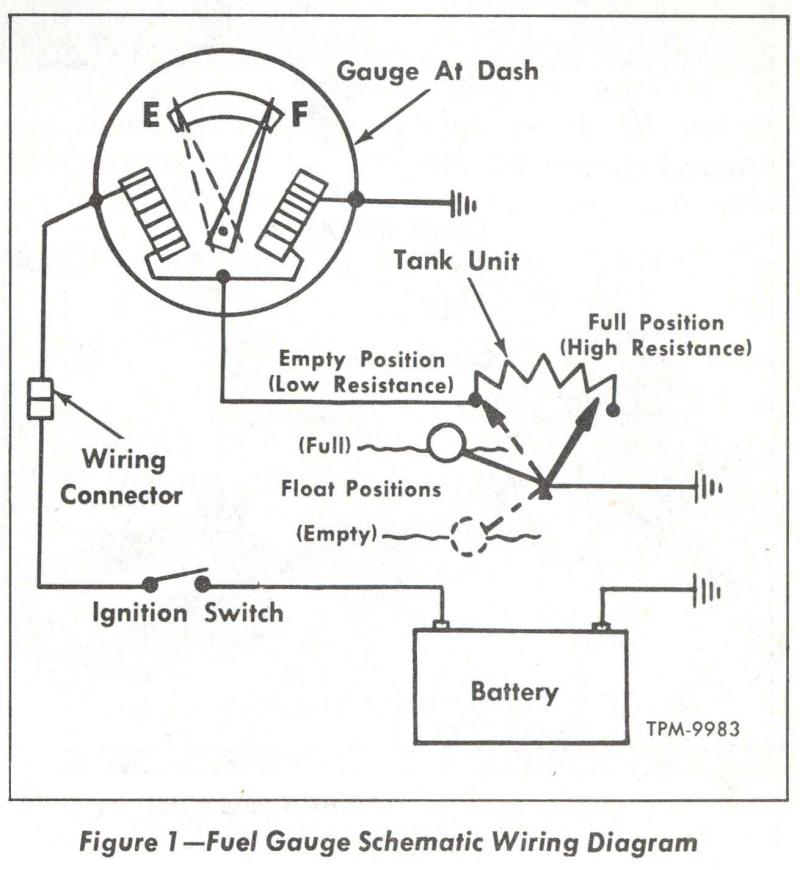
A 2-wire fuel sending unit works by varying resistance based on the fuel level. The float arm, connected to a variable resistor, changes position as the fuel level fluctuates. This change in resistance corresponds to a different reading on the fuel gauge. For example, a higher resistance typically indicates a lower fuel level.
One benefit of knowing how to test a 2-wire fuel sending unit is cost savings. You can avoid unnecessary mechanic visits by diagnosing the problem yourself. Another benefit is increased self-sufficiency. Empowering yourself to fix car issues builds confidence and saves you from being stranded. Lastly, understanding how your vehicle works leads to better maintenance practices, extending its lifespan.
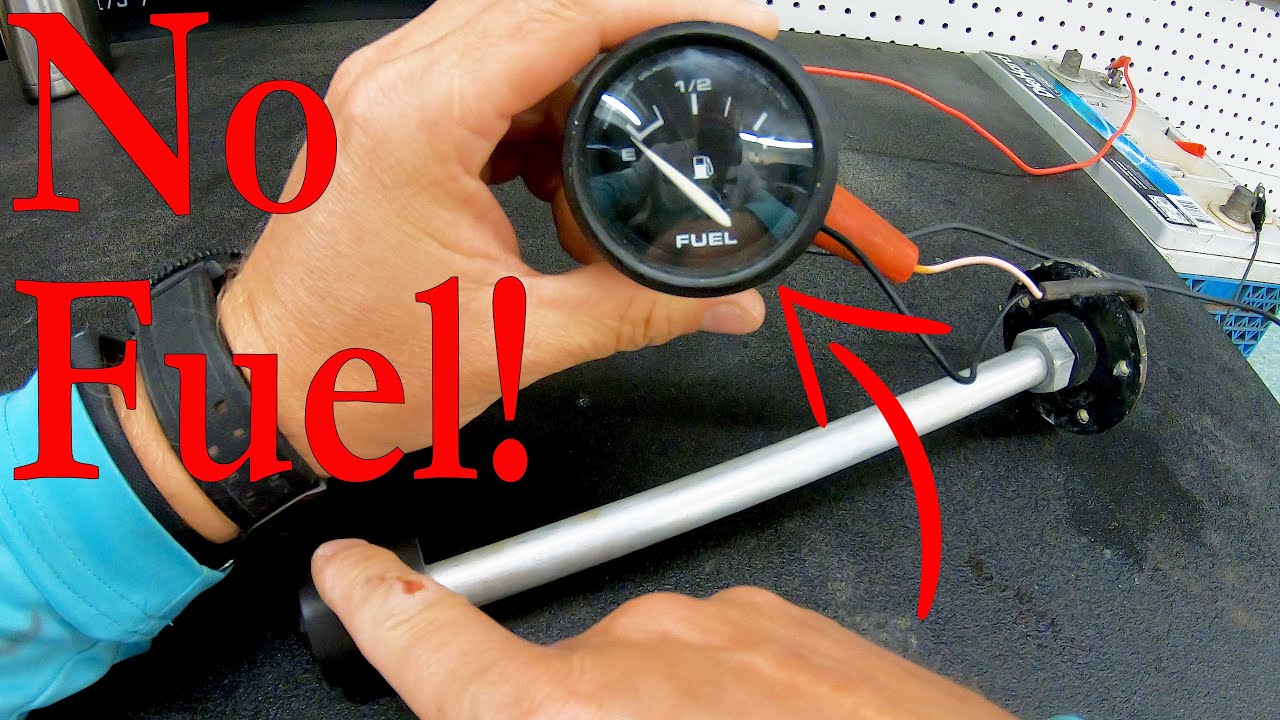
To test a 2-wire fuel sending unit, you’ll need a few basic tools: a multimeter, a wiring diagram for your vehicle, and potentially a helper. First, disconnect the negative battery cable for safety. Locate the sending unit, usually accessible through an access panel in the trunk or under the rear seat. Disconnect the wiring harness from the sending unit and use your multimeter to check the resistance between the two terminals. The reading should change as you move the float arm manually.
Checklist:
- Multimeter
- Wiring Diagram
- Safety Glasses (Recommended)
- Helper (Optional)
Advantages and Disadvantages of Testing a 2-Wire Fuel Sending Unit Yourself
| Advantages | Disadvantages |
|---|---|
| Cost Savings | Potential for Misdiagnosis |
| Increased Self-Sufficiency | Time Commitment |
| Better Vehicle Understanding | Requires Basic Tools and Knowledge |
Best Practice: Always consult your vehicle’s specific wiring diagram to ensure you are testing the correct wires and using the appropriate settings on your multimeter.
FAQ:
Q: What if the resistance doesn't change when I move the float arm?
A: The sending unit is likely faulty and needs to be replaced.
Q: Can I test the fuel sending unit without a multimeter?
A: Not accurately. A multimeter is essential for measuring resistance.
Q: Where can I find the wiring diagram for my vehicle?
A: Check your owner's manual or search online resources.
By mastering this simple skill, you're not just fixing a car problem; you're taking control of your finances, building self-reliance, and becoming a more informed vehicle owner. Knowing how to test a 2-wire fuel sending unit puts you in the driver's seat, both literally and figuratively. So grab your multimeter and empower yourself to conquer your fuel gauge woes!
Unlocking tiny minds educational play for toddlers 2
Kuromis kute paper doll dream houses diy fun for sanrio fans
Unlocking the secrets toyota rav4 trd off road resale value

1 Wire Fuel Sending Unit Wiring Diagram | Innovate Stamford Now
How To Wire A Boat Fuel Gauge | Innovate Stamford Now

How To Wire A Boat Fuel Gauge | Innovate Stamford Now

How To Wire Fuel Sending Unit To Gauge at Myrtis Hall blog | Innovate Stamford Now

Boat Fuel Sender Wiring Gauge | Innovate Stamford Now

1972 Chevy Truck Fuel Gauge Wiring Diagram | Innovate Stamford Now
Wiring A Fuel Gauge | Innovate Stamford Now

2 Wire Fuel Sending Unit Wiring Diagram | Innovate Stamford Now

Chevy Temperature Sender Wiring Diagrams Automotive | Innovate Stamford Now

Oil Sending Unit Wiring Diagram at Keith Wallace blog | Innovate Stamford Now

Fuel Sending Unit Wiring | Innovate Stamford Now

Fuel Gauge Wiring Basic | Innovate Stamford Now

how to test a 2 wire fuel sending unit | Innovate Stamford Now

Diesel Fuel Gauge Sending Unit at Dylan Moreira blog | Innovate Stamford Now

Auto Fuel Gauge Wiring Diagram | Innovate Stamford Now